Self Hosted Conditional Access Service
In order to consume our AiTM feed directly into your conditional access policies you can take one of two approaches:
Take advantage of our hosted service (which is a 5 second point and click exercise)
Host your own service (which is a little more complicated, but documented here)
There are multiple advantages to #1 so, if the required permissions allow, we would advise taking this route. If not then #2 will achieve essentially the same outcome, but does come with some added complexity.
Overview
There are a couple of options for hosting your own application. The first is to fire up an IDE and write the code. Another is to take advantage of some workflow automation tooling. We are going to focus on the latter in this post. Specifically we are going to cover how to automate the updating of your conditional access policy named locations using Azure Logic Apps.
This is really a two stage process:
Create an app registration within Microsoft Azure - the app registration is used in order to provide the required authentication and permissions within your environment (we are basically replicating what exists for the Lab539 hosted service, but within your own environment)
Build an Azure Logic App - this app is what will both obtain the latest fee data and create/update your named location accordingly.
If you’re interested in why we made some of the decisions (which in some cases may seem sub-optimal) then jump to the Design Decisions section at the end and we’ll explain.
Creating an app registration within Microsoft Azure
This video takes you through the process of creating an app registration and setting up permissions so that it can be used to periodically update a named location. This stage is essential if you want your logic app to work:
If you’re already an app registration ninja then all you really need to know is that:
You need to set up a client secret
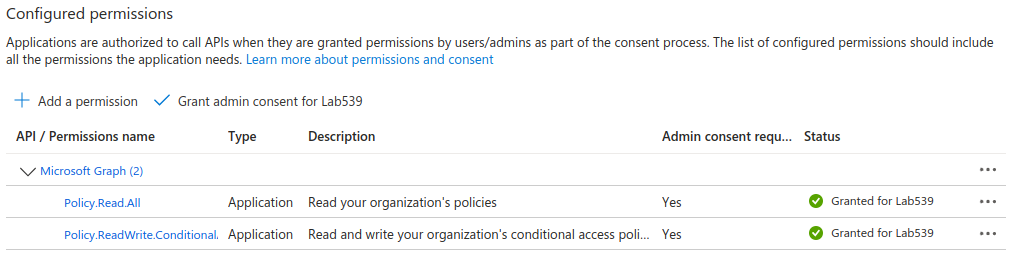
You need to set the required API permissions and grant admin consent:
Building an Azure Logic App
When you have an app registration created the next thing to do is to create the Logic App which will use this registration in order to create and update a named location for you. We have already created a template which you can download the ARM template from here. And here is a video showing how you can import and run this within your environment:
We have a sample ARM template can be deployed as an Azure Logic App to query the AiTM feed and automatically populate a named location periodically for you. You’ll need to insert your API key and the relevant environment information. The following guide takes you through that process.
Recommended Self Hosted Approach
We have recently updated the ARM template used for self hosted instances. This template is much simpler than the previous templates but it does require an additional initial step in order to set things up. That step being to create a named location and obtain the named location ID.
Creating the Named Location
Named locations can be created from with Azure here: https://portal.azure.com/#view/Microsoft_AAD_ConditionalAccess/ConditionalAccessBlade/~/NamedLocations
Select the “+ IP ranges location” button to begin this process.
You should name your named location according to which feed it is consuming. For example if you are consuming the AiTM feed you should name it “Lab539 - AiTM”. Current options are shown in the table below:
| Feed | Named Location Name |
|---|---|
| aitm | Lab539 - AiTM |
| expressvpn | Lab539 - ExpressVPN |
| stark | Lab539 - Lab539 - Stark Industries Solutions |
| tor-exits | Lab539 - Tor Exits |
| xhost | Lab539 - XHOST Internet Solutions LP |
| aeza | Lab539 - Aeza Group |
| routerhosting | Lab539 - RouterHosting |
| digitalocean | Lab539 - DigitalOcean |
In reality you can name it whatever you like, but it will be renamed according to the table when it is updated. Therefore we recommend using the named location names according to the table in order to avoid confusion.
You are required to populate any named location you create with some data. This will get overwritten once your logic app is up and running, so it doesn’t matter too much what you use, but we’d advise going for something like 127.0.0.2/32 (basically something that should never log into your environment).

Once done your named location is created. Next we need to obtain the named location ID - if you plan to consume multiple named location feeds then we recommend creating all of your named locations now, this will save you repeating the next step several times.
Obtaining the Named Location ID
We are not aware of a trivial way to obtain the named location ID (if you know of one then please let us know!), so the most straightforward way we can think of is to use the Microsoft Graph Explorer. This is an online platform hosted by Microsoft that allows you to interact with the MS Graph API without the need to write any code. You’ll find it here: https://developer.microsoft.com/en-us/graph/graph-explorer
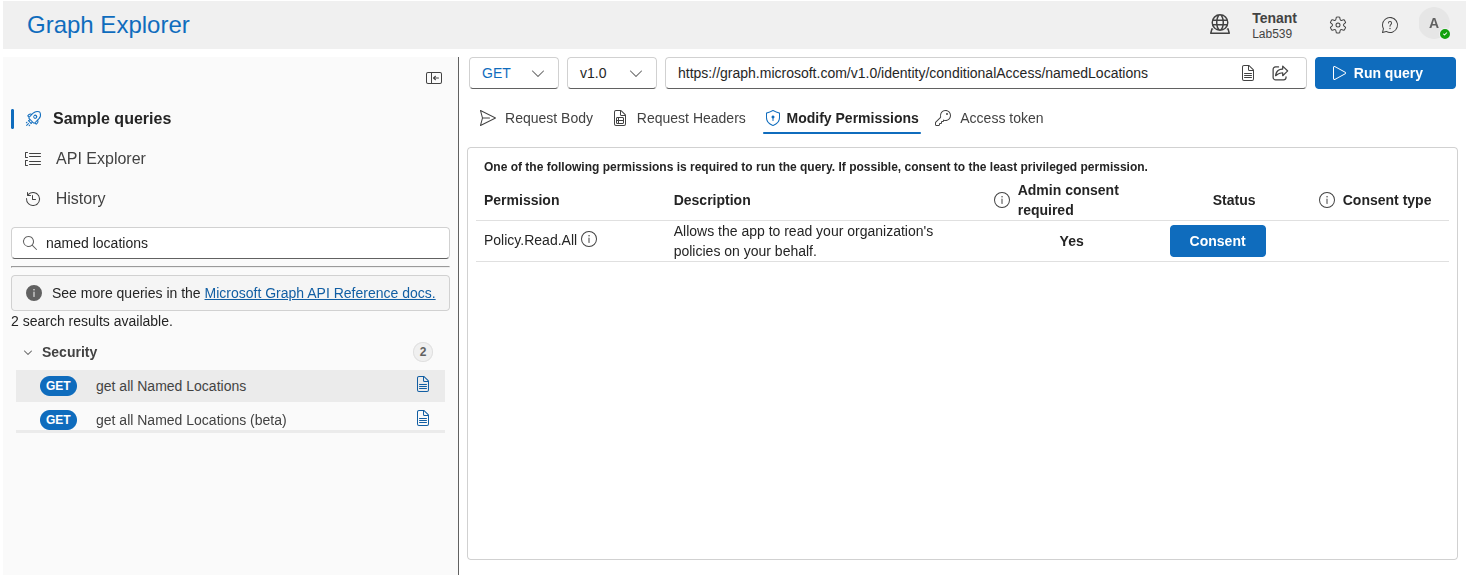
First of all sign in by clicking on the user/sign-in icon in the top right of the page. And then in the search on the left search for “named locations”. The API call we are interested in is the “get all Named Locations” call.
If you hit “Run query” and you get an error telling you that you are unauthorised then you should jump into the “Modify Permissions” tab and consent to the required permissions by hitting the “Consent” button shown below:
With everything functioning you should see some JSON in the response preview window which represents all of your named locations:

If you have multiple named locations already then there might be quite a bit to go through, but what you need to extract is the “id” value for the named location(s) you created. The output above shows us obtaining the named location ID for the “Lab539 - AiTM” named location. Record the IDs of the named locations you wish to update using the logic app you are about to create. Be careful to ensure that you get these correct, if copy the wrong ID then you will end up overwriting the wrong named location, so please take a moment to double check everything.
Creating the Logic App
The “Building an Azure Logic APP” video above takes you through the process of creating a logic app. This video is still applicable, but our logic app codebase has simplified a lot since v2.0 of our templates. You can download the latest template here:
This template takes the name of the feed as a parameter, meaning that once you have deployed one logic app you can clone it and alter just the “Feed” and “NamedLocationID” parameters in order to consume other feeds.
In previous versions we attempted to make things simple by obtaining your named location ID for you, but this was cumbersome and meant the app needed to search based upon named location name rather than ID. We also wanted to avoid the pain of requiring you to set up local storage to hold details of the named location IDs, which meant that every update required the app to search based upon name. It was far from ideal. It also meant that duplicating the logic app or adding additional apps for other feeds was painful too. And then there are the occasional blips in Azure which result in the logic app not seeing an existing named location and so creating a new one… did we say it was painful? And all because it is non-trivial to obtain a named location ID!!!
The v3.0+ codebase is far more streamlined and much more representative of how the managed service we provide. It simply makes two requests, one to obtain the latest named location data using your API key and one to push that data into your named location. This is what the Logic app designer looks like once you’ve imported the ARM template:

The process for deployment remains the same, except parameters are now handled much better and accessible from the “Parameters” menu above. You need to set the following parameters in order for the logic app to function:
| Parameter | Description |
|---|---|
| TenantID | This is your Microsoft tenant ID, which you will find on your Azure home page: https://portal.azure.com/#view/Microsoft_AAD_IAM/ActiveDirectoryMenuBlade/~/Overview |
| AppID | This is the AppID for the app registration you created for this service. It is named "Application (client) ID" in the app registration overview page. |
| Secret | This is the secret that you generated for the app registration. |
| ApiKey | This is your Lab539 API key. You'll find this in the portal: https://portal.lab539.io |
| NamedLocationID | This is the ID of your named location that we obtained earlier using MS Graph |
| Feed | This is the feed you are consuming and must be exactly one of the following: aitm, expressvpn, stark, tor-exits, xhost, aeza, routerhosting, digitalocean. |
If everything is set up correctly then you should be OK to run your logic app. If successful it will populate the relevant named location for you every 17 minutes (or more or less frequently depending on whether you changed that value.
Deprecated ARM Templates
The following ARM templates are provided for reference purposes. Whilst they are functional and stable we do not recommend that you use these templates anymore (please use v3.0+) as they will limit future flexibility.
Current ARM Templates
Design Decisions
This section is not essential reading, but if you are interested in why we’ve taken some of the approaches that we have it may be of interest.
Webhook vs Polling the API
We really wanted to use webhooks in order to provide real time updates, but because new data often comes in batches, and because logic app workflows run in parallel, we’d have to do something to maintain state so that you were not suddenly hit with 20 concurrent updated to your named location, which inevitably would cause issues. It’s doable with some backend storage, but that suddenly made things quite complicated.
POST vs PATCH
In the legacy logic app, the first time the named location is created we populate it with 127.0.0.1/32 and then update it. The reason for this is that, for some reason, there is a much stricter limit on the size of POST requests within logic apps than there is with PATCH requests. As a result the POST request required to create the initial named location will fail if there is too much data within the named location (which there often is). The same does not appear to be true of the update request, which is identical to the create request other than the use of PATCH instead of POST. Therefore, it’s much more reliable to create a very small named location and then immediately update it in order to populate it with data. We filed that one under “Azure quirks”!
From v3.0 onwards we only PATCH because you manually create the named location rather than the logic app.
Partial vs Full Update
The approach this app takes doesn’t really update a named location with new data, rather it overwrites it with the most up to date data (this is the same approach that we take with the hosted service too). The reason for this is that we want to ensure that if an update fails in your environment, for whatever reason, that you will not miss out on having that infrastructure added to your named location. Updating in full each time ensures you never miss historical data. Whilst not quite as documented by Microsoft, this approach also means that old infrastructure is removed from your named locations without deleting and creating a new named location, which would invariably mean a need to update your conditional access policies to use the new named location.
Azure Logic App vs Power Automate
You could easily create something quite similar to this using power automate. We went down the logic app route because the feedback we got from you was that this was your preference. It also felt more suited to the task and Microsoft make querying the MS Graph API a premium feature in power automate, in logic apps it’s not, so it’s also a cheaper option.